This study guide covers the Astronomer Certification DAG Authoring for Apache Airflow. Apache Airflow is the leading orchestrator for authoring, scheduling, and monitoring data pipelines. The exam consists of 75 questions, and you have 60 minutes to write it. The study guide below covers everything you need to know for it. The exam includes scenarios (both text and images of Python code) where you need to determine what the output will be, if any at all. To study for this exam I watched the official Astronomer preparation course, I highly recommend it.
According to Astronomer, this exam will test the following:
“You have to show your capabilities of understanding the different features that Airflow brings to create DAGs. What are the pros and cons of each one as well as their limitations. You should be comfortable for recommending settings and design choices for data pipelines according to different use cases. You should know the most common operators as well as the specificities of others allowing to define DAG dependencies, choose different branches, wait for events and so on”
Study Guide
-
Variables
- Variables are a generic way to store and retrieve arbitrary content or settings as a simple key value store within Airflow. Variables can be listed, created, updated and deleted from the UI. Airflow uses Fernet to encrypt variables stored in the metastore database. It guarantees that without the encryption password, content cannot be manipulated or read without the key. For information on configuring Fernet, look at Fernet.
- Variables can be viewed using the Airflow UI under Variables
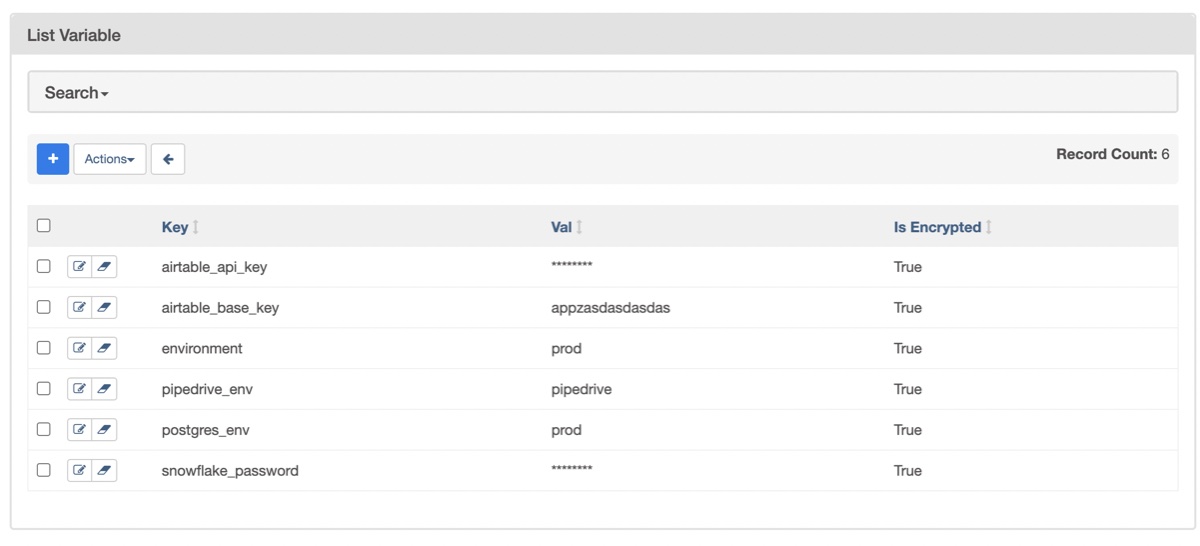 Variables in Airflow UI
 - Best practice: try to fetch the variables within the tasks, to avoid making useless connections every 30 seconds
-
You can use JSON values to call multiple variables in an efficient manner, using the Jinja Template Engine. You can create the variable list using the Airflow UI
{extract = PythonOperator(
task_id="extract".
python_callable=_extract,
op_args=["{{ var.json.my_dag_partner.name }}"])
-
Pools
- Airflow pools are used to limit the execution parallelism on arbitrary sets of tasks. Each time a task is running, a slot is given to that task throughout its execution. Once the task is finished, the slot is free again and ready to be given to another task. A slot is given regardless of the resources a task needs. It’s really just a slot, 1 task = 1 slot. If there is no more slots available, the tasks will be queued and so the number of queued slots will increase. By default, you can execute at most 128 tasks at the same time as the default pool has 128 slots, and it is running in the
default_pool. - The concurrency or the limit to the maximum number of running tasks for a given DAG is set to 16 by default (dag_concurrency / concurrency). In other words, you can run 16 tasks at the same time for a same DAG.
- 1 task running at a time is equal to 1 worker
- There are three ways you can create and manage a pool in Airflow.
- Create a pool through the Airflow UI
- Go to Admin → Pools and add a new record. You can define a name, the number of slots, and a description.
- Create a pool using the Airflow CLI with the airflow pools command
- Create a pool using the Airflow REST API
- Create a pool through the Airflow UI
-
By default, all tasks in Airflow get assigned to the default_pool which has 128 slots. You can modify this value, but you can’t remove the default pool. Tasks can be assigned to any other pool by updating the pool parameter. This parameter is part of the BaseOperator, so it can be used with any operator.
task_a = PythonOperator(
    task_id='task_a',
    python_callable=sleep_function,
    pool='single_task_pool'
)
- Airflow pools are used to limit the execution parallelism on arbitrary sets of tasks. Each time a task is running, a slot is given to that task throughout its execution. Once the task is finished, the slot is free again and ready to be given to another task. A slot is given regardless of the resources a task needs. It’s really just a slot, 1 task = 1 slot. If there is no more slots available, the tasks will be queued and so the number of queued slots will increase. By default, you can execute at most 128 tasks at the same time as the default pool has 128 slots, and it is running in the
-
Trigger Rules
- Basically, a trigger rule defines why a task gets triggered, on which condition. By default, all tasks have the same trigger rule
all_successset which means, if all parents of a task succeed, then the task gets triggered. Only one trigger rule at a time can be specified for a given task - Here is a list of common trigger rules
all_success: the task gets triggered when all upstream tasks (parents) have succeeded.all_failed: gets triggered if all the parent tasks failall_done: You just want to trigger your task once all upstream tasks (parents) are done with their execution whatever their state. good for emails and Slack messages, regardless of success or failureone_failedandone_success: if one of the parents succeeds or fails, not waiting for all the parents to complete. Can be useful if you have some long-running tasks and want to do something as soon as one fails.none_failed: if the parents are skipped or succeeded. Won’t trigger if one of the parents has failed or has a status ofupstream_failed. Only useful if you want to handle the skipped status.none_skipped: With this simple trigger rule, your task gets triggered if no upstream tasks are skipped. If they are all in success or failed. Use case if you use branch python operatornone_failed_or_skipped: trigger tasks if at least one of the parents has succeeded and all the parents have been completeddummy: does nothing, just triggers
- Basically, a trigger rule defines why a task gets triggered, on which condition. By default, all tasks have the same trigger rule
-
DAG Dependencies
ExternalTaskSensor: Waits for a different DAG or a task in a different DAG to complete for a specific execution_dateexternal_dag_id:Thedag_idthat contains the task you want to wait forexternal_task_id:Thetask_idthat contains the task you want to wait for. IfNonethe sensor waits for the DAGallowed_states: list of allowed states, default issuccessexecution_delta: time difference with the previous execution to look at, the default is the same execution_date as the current task or DAG. For yesterday, usepositivedatetime.timedelta(days=1). Eitherexecution_deltaorexecution_date_fncan be passed toExternalTaskSensor, but not both.execution_date_fn: function that receives the current execution date and returns the desired execution dates to query. Eitherexecution_deltaorexecution_date_fncan be passed toExternalTaskSensor, but not both.check_existence: Set toTrueto check if the external task exists (when external_task_id is not None) or check if the DAG to wait for exists (when external_task_id is None), and immediately cease waiting if the external task or DAGfailed_states: expects a list of statuses. By default it is empty, so if the task you are waiting for fails, the task will waitng forever. So you need to define this. You can putfailedandskippedallowed_states: expects a list of statuses. You can saysuccess, so if the task you are waiting for succeeded, then it works
TriggerDagRunOperator: An easy way to implement cross-DAG dependencies. This operator allows you to have a task in one DAG that triggers another DAG in the same Airflow environment. TheTriggerDagRunOperatoris ideal in situations where you have one upstream DAG that needs to trigger one or more downstream DAGs, or if you have dependent DAGs that have both upstream and downstream tasks in the upstream DAG (i.e. the dependent DAG is in the middle of tasks in the upstream DAG). Because you can use this operator for any task in your DAG, it is highly flexible. It’s also an ideal replacement for SubDAGs. Below is an example DAG that implements theTriggerDagRunOperatorto trigger the dependent-dag between two other tasks.- Here is a list of arguments that it takes
trigger_dag_id: The dag_id to trigger (templated).trigger_run_id: The run ID to use for the triggered DAG run (templated). If not provided, a run ID will be automatically generated.conf: Configuration for the DAG run.execution_date: Execution date for the dag (templated).reset_dag_run: Whether or not clear existing dag run if already exists. This is useful when backfill or rerun an existing dag run. Whenreset_dag_run=Falseand dag run exists,DagRunAlreadyExistswill be raised. Whenreset_dag_run=Trueand dag run exists, existing dag run will be cleared to rerun.wait_for_completion: Whether or not wait for dag run completion. (default:False)poke_interval: Poke interval to check dag run status when wait_for_completion=True. (default: 60)allowed_states: List of allowed states, default issuccessfailed_states: List of failed or dis-allowed states, default isNone.
from airflow import DAG from airflow.operators.python import PythonOperator from airflow.operators.trigger_dagrun import TriggerDagRunOperator from datetime import datetime, timedelta def print_task_type(**kwargs): """ Dummy function to call before and after dependent DAG. """ print(f"The {kwargs['task_type']} task has completed.") # Default settings applied to all tasks default_args = { 'owner': 'airflow', 'depends_on_past': False, 'email_on_failure': False, 'email_on_retry': False, 'retries': 1, 'retry_delay': timedelta(minutes=5) } with DAG('trigger-dagrun-dag', start_date=datetime(2021, 1, 1), max_active_runs=1, schedule_interval='@daily', default_args=default_args, catchup=False ) as dag: start_task = PythonOperator( task_id='starting_task', python_callable=print_task_type, op_kwargs={'task_type': 'starting'} ) trigger_dependent_dag = TriggerDagRunOperator( task_id="trigger_dependent_dag", trigger_dag_id="dependent-dag", wait_for_completion=True ) end_task = PythonOperator( task_id='end_task', python_callable=print_task_type, op_kwargs={'task_type': 'ending'} ) start_task >> trigger_dependent_dag >> end_task- There are two ways of defining dependencies
- Old way, which is not recommended
set_upstreamset_downstream
- New way, which is the current standard
>>and<<
- If you want to create dependencies between two lists, you need to use cross dependencies
cross_downstream([t1,t2,t3],[t4,t5,t6])- You cannot add anything to this, you would need to define on a new line
[t4,t5,t6] >> t7
- Old way, which is not recommended
- Chain Dependencies
-
What if you want to set multiple parallel cross-dependencies? Unfortunately, Airflow can’t parse dependencies between two lists (e.g. [t0, t1] » [t2, t3] throws an error). If you need to set dependencies in this manner, you can use Airflow’s
chainfunction:from airflow import DAG from airflow.operators.dummy_operator import DummyOperator from airflow.models.baseoperator import chain with DAG('dependencies', ) as dag: t0 = DummyOperator(task_id='t0') t1 = DummyOperator(task_id='t1') t2 = DummyOperator(task_id='t2') t3 = DummyOperator(task_id='t3') t4 = DummyOperator(task_id='t4') t5 = DummyOperator(task_id='t5') t6 = DummyOperator(task_id='t6') chain(t0, t1, [t2, t3], [t4, t5], t6) - it produces this graph
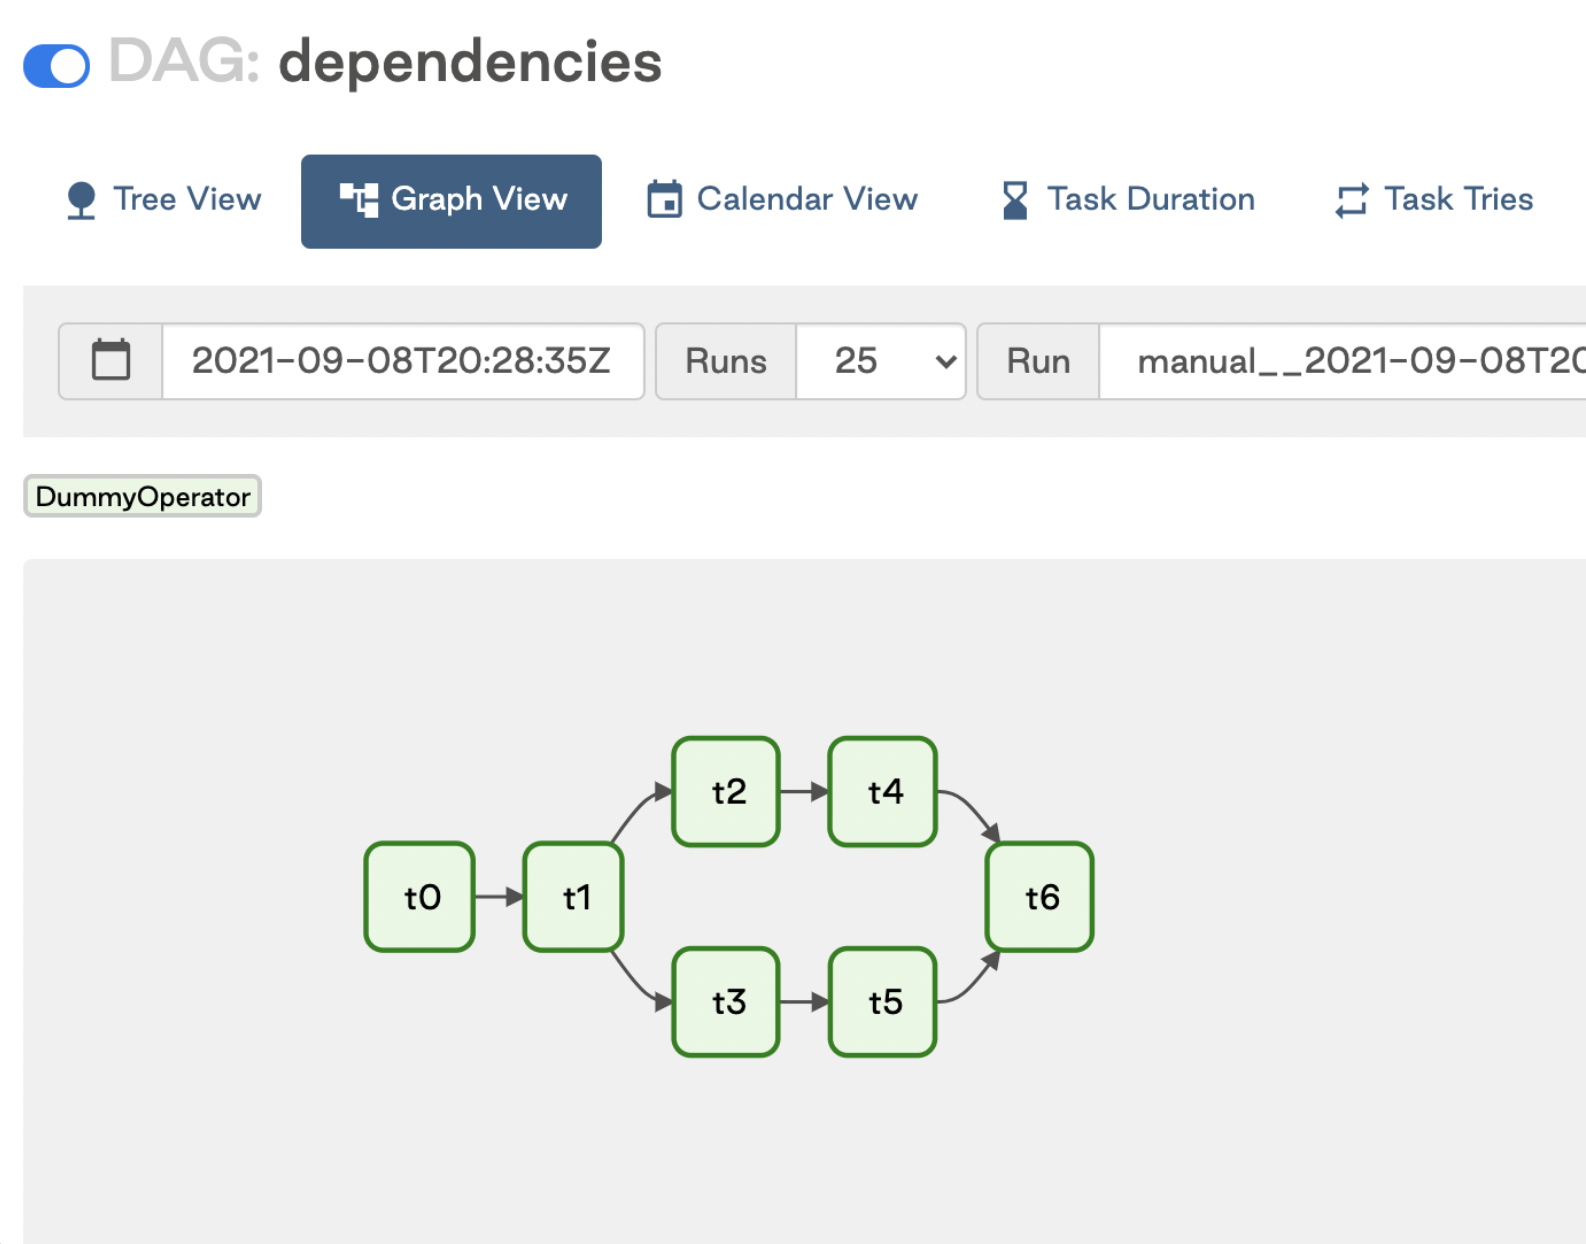 chain function
 depends_on_past: When set to True, keeps a task from getting triggered if the previous schedule for the task hasn’t succeeded. Unless a previous run of your DAG has failed, the depends_on_past should not be a factor, it will not affect the current run at all if the previous run executed the tasks successfully. It does not prevent the next DAG run from running if the previous DAG run did not succeed. There will be no status.
-
-
Idempotency
- When designing data pipelines, always aim for idempotence and determinism
- Determintistic: When you execute your task with a certain input, you will always get the same output
- Idempotence: When you execute multiple times, your task will always produce the same result
PostgresOperator(task_id='create_table', sql='CREATE TABLE my_table;')is not idempotentPostgresOperator(task_id='create_table', sql='CREATE TABLE IF NOT EXISTS my_table;')is idempotent
- When designing data pipelines, always aim for idempotence and determinism
-
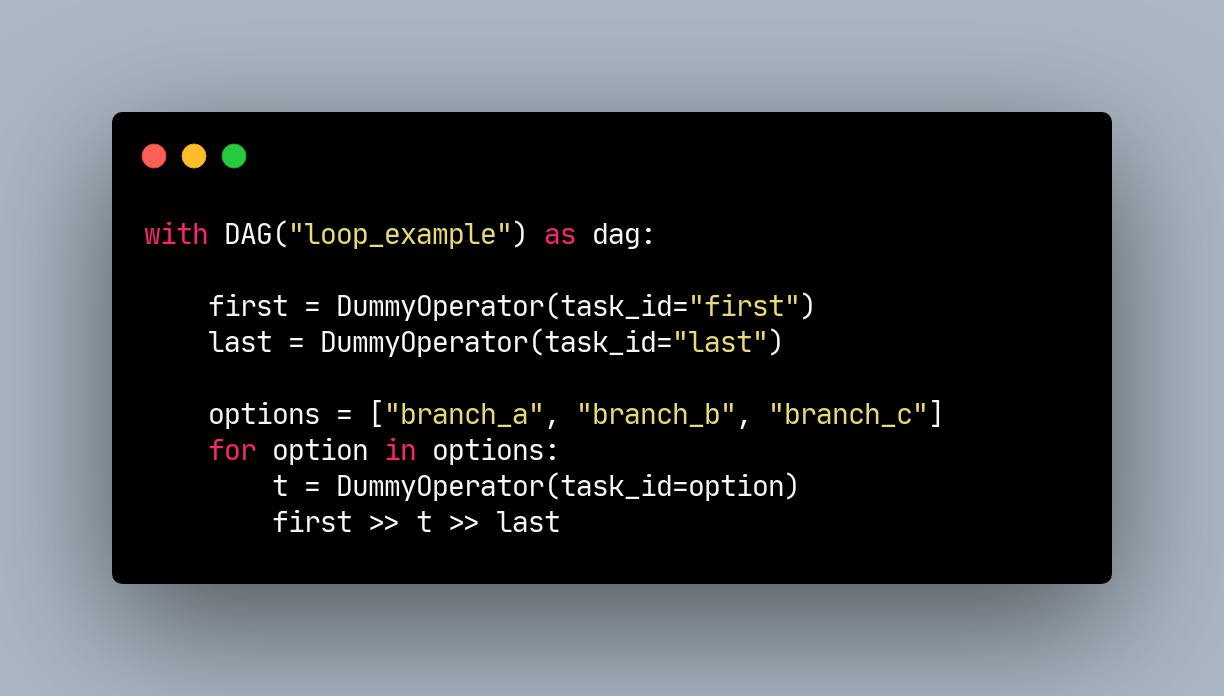
Dynamic DAGs
- In Airflow, DAGs are defined as Python code. Airflow executes all Python code in the dags_folder and loads any DAG objects that appear in globals(). The simplest way of creating a DAG is to write it as a static Python file. However, sometimes manually writing DAGs isn’t practical. Maybe you have hundreds or thousands of DAGs that do similar things with just a parameter changing between them. Or maybe you need a set of DAGs to load tables, but don’t want to manually update DAGs every time those tables change. In these cases, and others, it can make more sense to dynamically generate DAGs.
- Whenever you have multiple DAGs that have the same tasks for which only the inputs change, then it might be better to generate those DAGs dynamically.
- There are two methods:
- Single-File Method
- One method for dynamically generating DAGs is to have a single Python file which generates DAGs based on some input parameter(s) (e.g. a list of APIs or tables). A common use case for this is an ETL or ELT-type pipeline where there are many data sources or destinations. This requires creating many DAGs that all follow a similar pattern.
- Benefits:
- It’s simple and easy to implement
- It can accommodate input parameters from many different sources (see a few examples below)
- Adding DAGs is nearly instantaneous since it requires only changing the input parameters.
- Drawbacks:
- Since a DAG file isn’t actually being created, your visibility into the code behind any specific DAG is limited.
- Since this method requires a Python file in the dags_folder, the generation code will be executed every time the dag is parsed
- Process
from airflow import DAG from airflow.operators.python_operator import PythonOperator from datetime import datetime def create_dag(dag_id, schedule, dag_number, default_args): def hello_world_py(*args): print('Hello World') print('This is DAG: {}'.format(str(dag_number))) dag = DAG(dag_id, schedule_interval=schedule, default_args=default_args) with dag: t1 = PythonOperator( task_id='hello_world', python_callable=hello_world_py, dag_number=dag_number) return dag - Multi-File Method:
- This time, instead of having one single Python file in charge of generating your DAGs , you are going to use a script that will create a file of each generated DAG. At the end you will get one Python File per generated DAG.
- Benefits:
- It’s more scalable than single-file methods. Because the DAG files aren’t being generated by parsing code in the dags_folder, the DAG generation code isn’t executed on every scheduler heartbeat.
- Since DAG files are being explicitly created before deploying to Airflow, you have full visibility into the DAG code, including from the Code button in the Airflow UI.
- Drawbacks:
- It can be complex to set up.
- Changes to DAGs or additional DAGs won’t be generated until the script is run, which in some cases requires a deployment.
- Process
-
To start, we will create a DAG ‘template’ file that defines the DAG’s structure. This looks just like a regular DAG file, but we have added specific variables where we know information is going to be dynamically generated, namely the
dag_id,scheduletoreplace, andquerytoreplace.from airflow import DAG from airflow.operators.postgres_operator import PostgresOperator from datetime import datetime default_args = {'owner': 'airflow','start_date': datetime(2021, 1, 1)} dag = DAG(dag_id, schedule_interval=scheduletoreplace, default_args=default_args, catchup=False) with dag: t1 = PostgresOperator( task_id='postgres_query', postgres_conn_id=connection_id sql=querytoreplace) -
Next we create a dag-config folder that will contain a JSON config file for each DAG. The config file should define the parameters that we noted above, the DAG Id, schedule interval, and query to be executed.
{ "DagId": "dag_file_1", "Schedule": "'@daily'", "Query":"'SELECT * FROM table1;'" } -
Finally, we create a Python script that will create the DAG files based on the template and the config files. The script loops through every config file in the
dag-config/folder, makes a copy of the template in the dags/ folder, and overwrites the parameters in that file with the ones from the config file.import json import os import shutil import fileinput config_filepath = 'include/dag-config/' dag_template_filename = 'include/dag-template.py' for filename in os.listdir(config_filepath): f = open(filepath + filename) config = json.load(f) new_filename = 'dags/'+config['DagId']+'.py' shutil.copyfile(dag_template_filename, new_filename) for line in fileinput.input(new_filename, inplace=True): line.replace("dag_id", "'"+config['DagId']+"'") line.replace("scheduletoreplace", config['Schedule']) line.replace("querytoreplace", config['Query']) print(line, end="") -
Now to generate our DAG files, we can either run this script ad-hoc or as part of our CI/CD workflow. After running the script, our final directory would look like the example below, where the include/ directory contains the files shown above, and the dags/ directory contains the two dynamically generated DAGs:
 dags/
  ├── dag_file_1.py
  ├── dag_file_2.py
  include/
  ├── dag-template.py
  ├── generate-dag-files.py
  └── dag-config
  ├── dag1-config.json
  └── dag2-config.json
-
- Single-File Method
-
Versioning
- Versioning does not currently exist in Airflow
- The issue is that if you remove a task, you will not be able to view this task in the past
dag_runlogs - There is a temporary way around this, by adding a suffix to your
dag_idlike_1_0_0
-
DAG Scheduling
- Important Parameters
start_date: Date at which your tasks are being scheduledschedule_interval: Interval of time from the min(start_date) at which the DAG is triggered. If it is set toNone, the DAG must be triggered manually
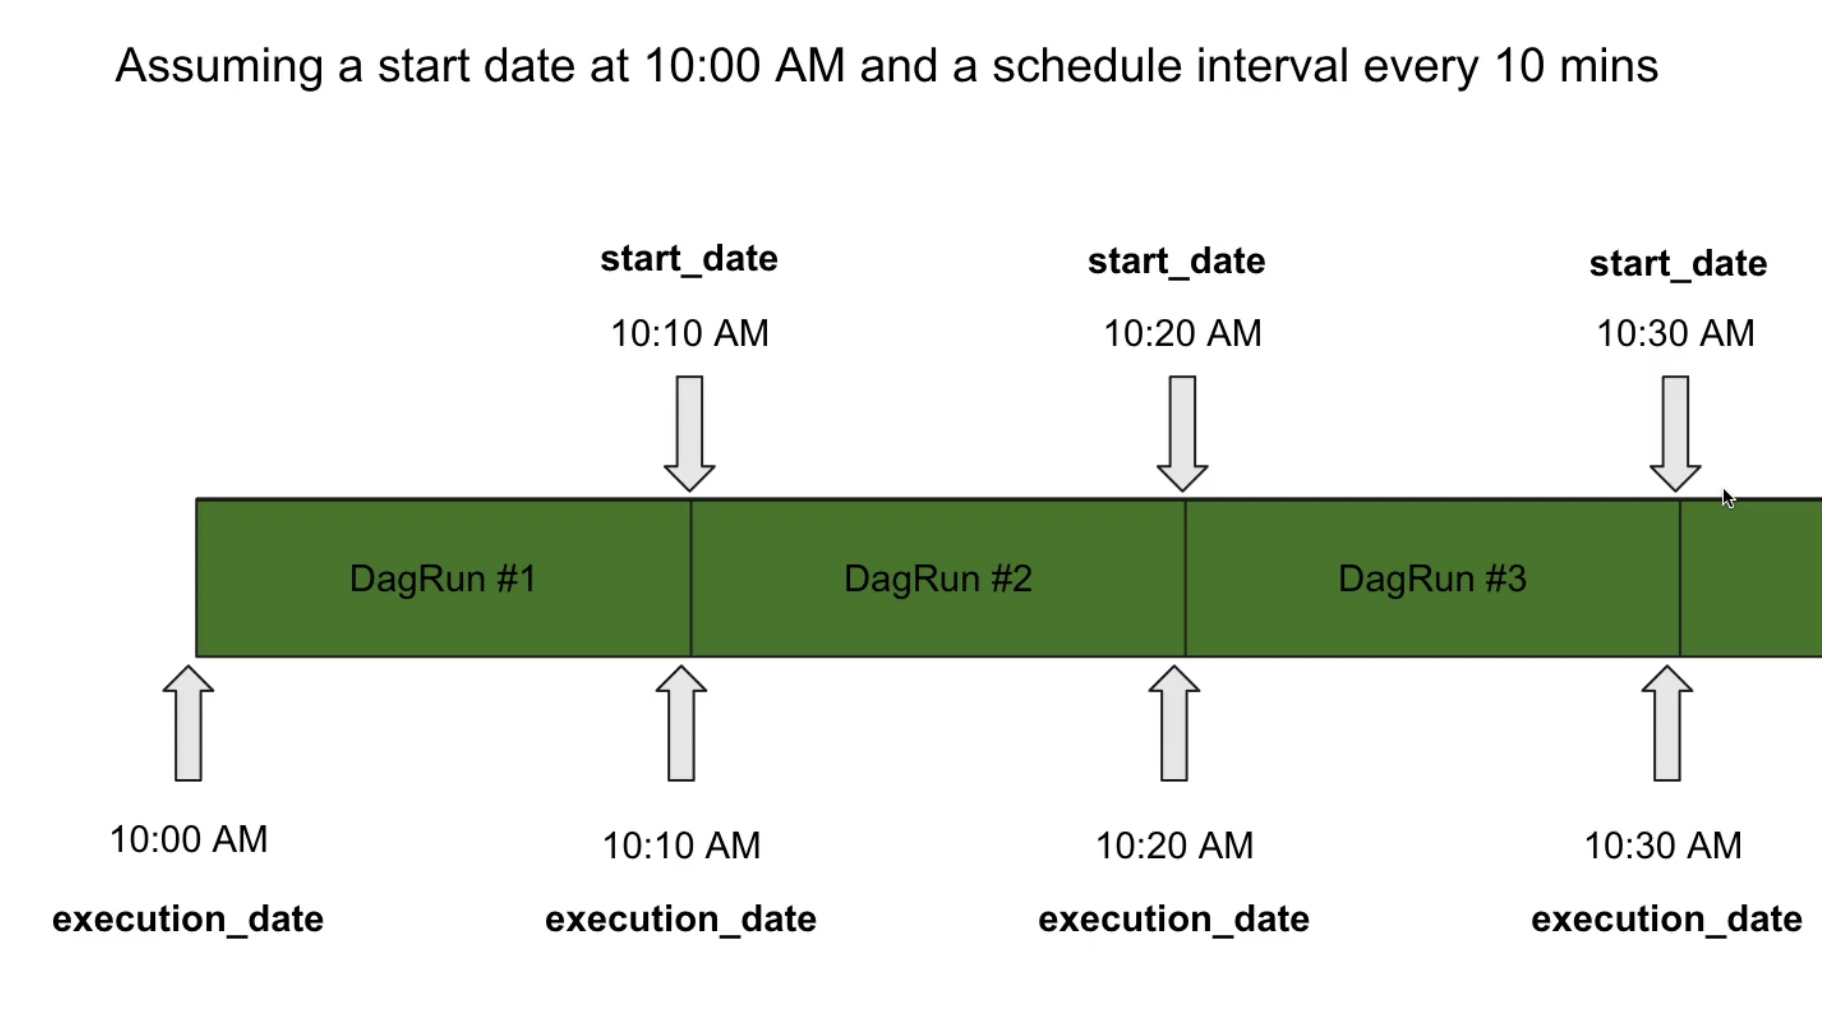 Execution Flow Chart
 - Timedelta vs CRON
- CRON expressions are stateless (as specified)
- TimeDelta is stateful (according to the previous execution date)
- Use case: When you want to trigger your DAG every three days,
TimeDeltais simpler because you don’t need to set the actual dates
- Important Parameters
-
Templating
- Airflow takes advantage of the power of Jinja Templating and this is a powerful tool to use in combination with macros. Jinja templating allows providing dynamic content using python code to otherwise static objects such as strings. In other words, it allows you to fetch a specific chunk of data based on a parameter, rather than fetching that exam same data every time. Since airflow Macros are evaluated while the task gets run, it is possible to provide parameters that can change during execution. For example, passing the result of one operator to another one that runs after it.
- Also, parameters such as execution dates can be passed to fields. All operators define some of the fields that are template-able, and only those fields can take macros as inputs.
- Allows you to inject data at runtime using double curly brackets
- The argument must be compatible with templating, you can check the documentation
dsis a predefined parameter corresponding to the execution date
-
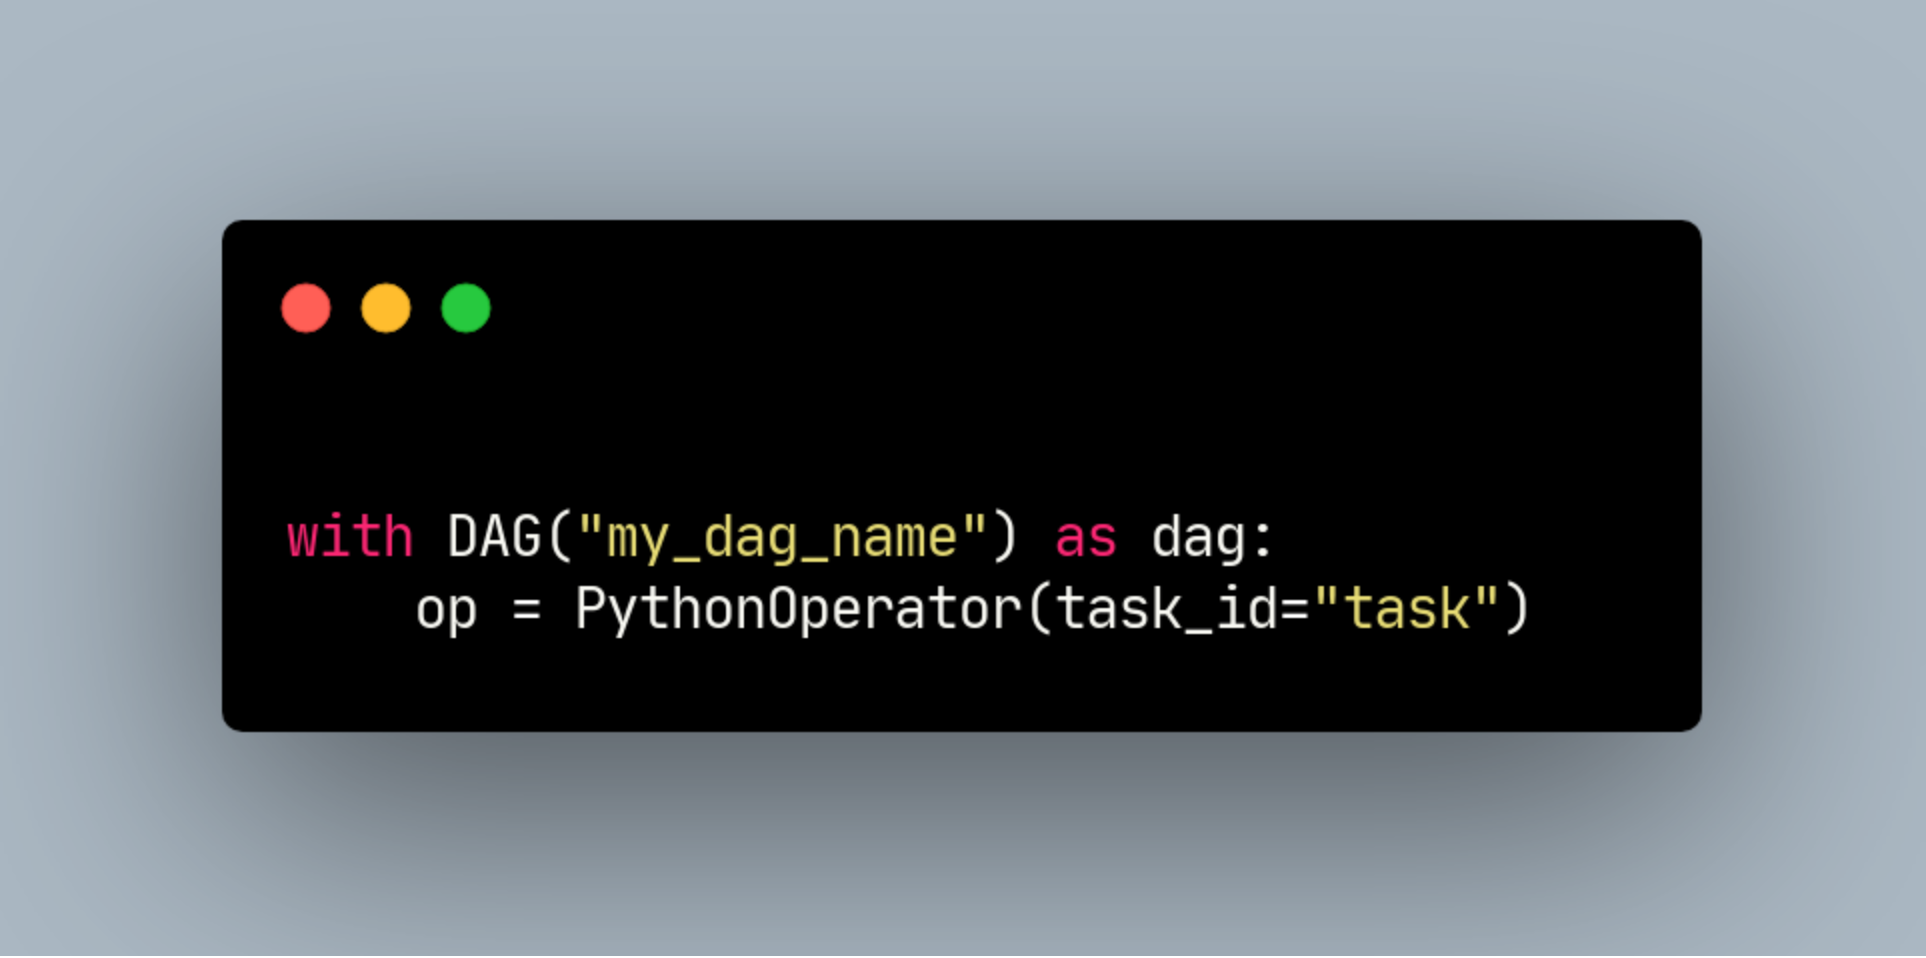
TaskFlow API
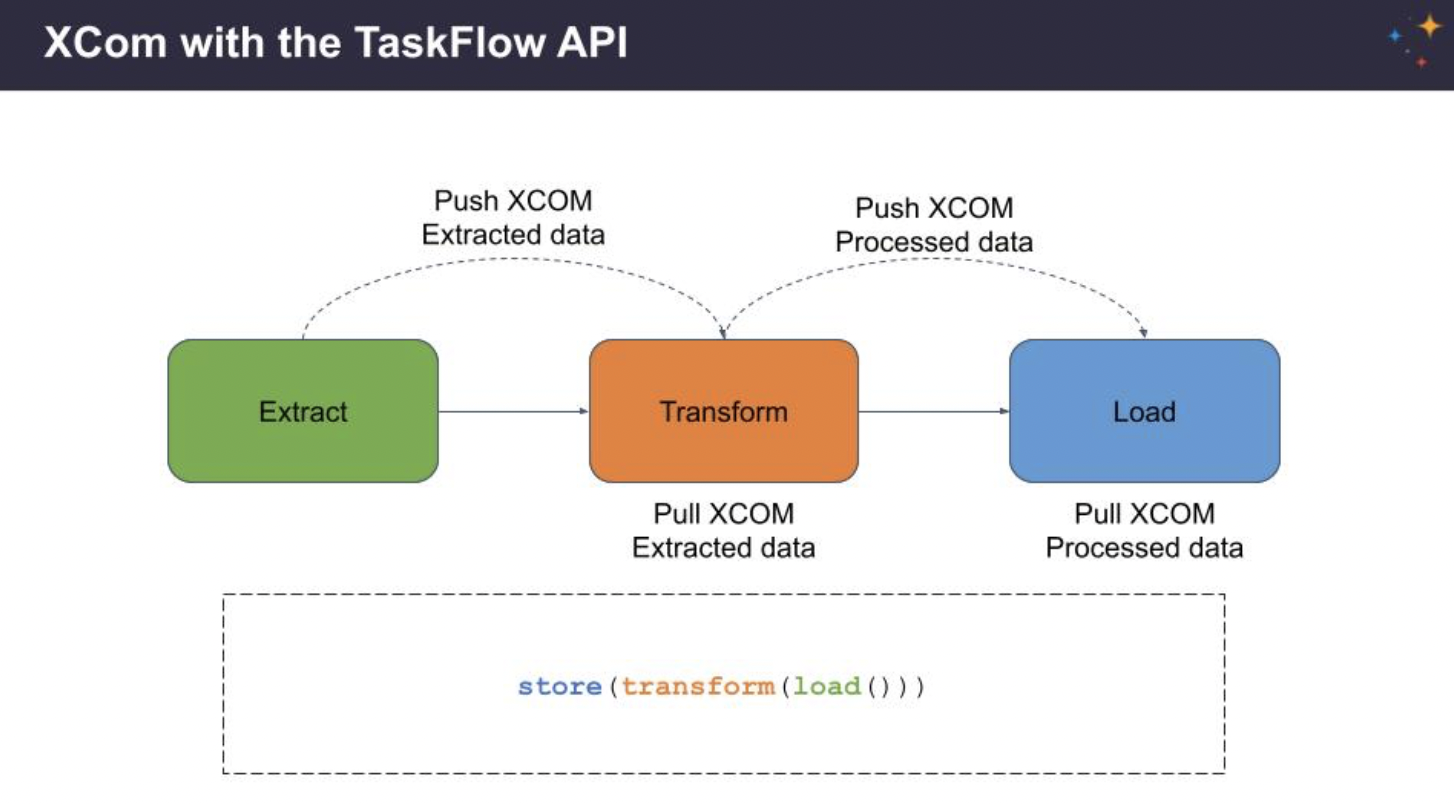
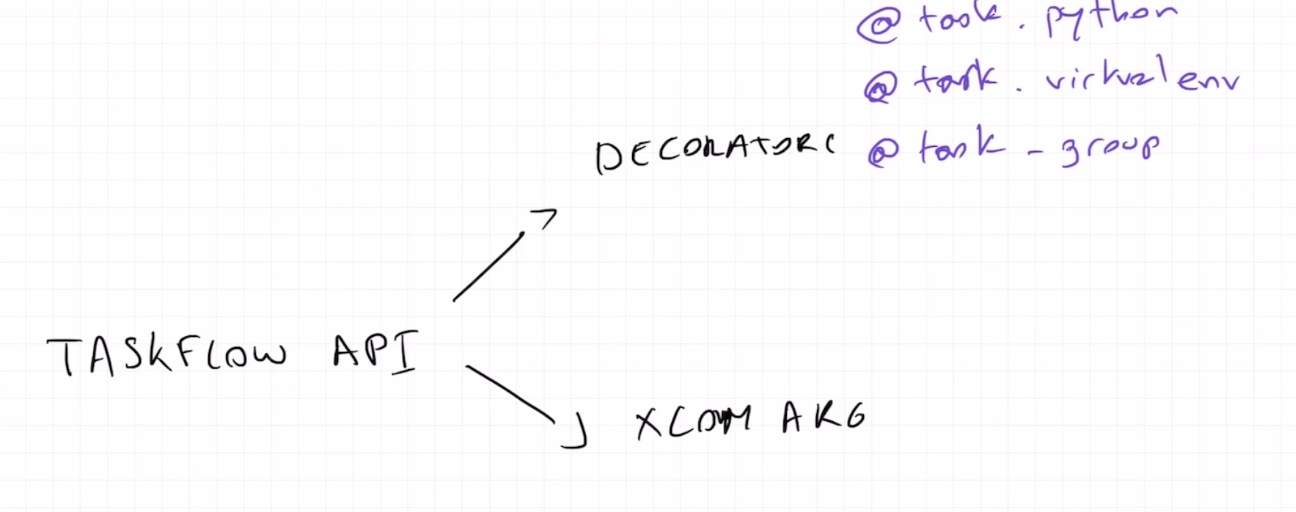
- TaskFlow takes care of moving inputs and outputs between your Tasks using XComs for you, as well as automatically calculating dependencies - when you call a TaskFlow function in your DAG file, rather than executing it, you will get an object representing the XCom for the result (an XComArg), that you can then use as inputs to downstream tasks or operators.
 Taskflow API
 - TaskFlow API Features
- XCom Args, which allow task dependencies to be abstracted and inferred as a result of the Python function invocation
- A task decorator that automatically creates PythonOperator tasks from Python functions and handles variable passing
-
Support for Custom XCom Backends
@dag(schedule_interval='@daily', default_args=default_args, catchup=False)
def taskflow():

    @task
    def extract_bitcoin_price() -> Dict [str,float):
        return requests.get (API).json()['bitcoin']

    @task(multiple outputs=True)
    def process_data(response: Dict[str, float]) -> Dict[str, float]:
        logging.info(response)
        return {'usd': response['usd'], 'change': response['usd_24h_change']}

    @task
    def store_data(data: Dict[str, float]):
        logging. info(f"Store: (data['usd']} with change {data['change']}")

    store data(process data(extract_bitcoin_price()))
- You cannot use the TaskFlow API between the parent DAG and the sub DAG. It tries to make the dependencies automatically for you, which means you are trying to create dependencies from your DAG and from your subDAG, which is not possible.
 Taskflow API
 multiple_outputs: if you want one XCOM for one value, without usingxcom_pushmore than once, you can set this argument to True. By specifying this arguemnt to true, you are saying this XCOM is not one XCOM with the diciotnary as a value, but two XCOMs with different values and keys.- -> Dict[str, str]: same as
multiple_outputs, and better
- TaskFlow takes care of moving inputs and outputs between your Tasks using XComs for you, as well as automatically calculating dependencies - when you call a TaskFlow function in your DAG file, rather than executing it, you will get an object representing the XCom for the result (an XComArg), that you can then use as inputs to downstream tasks or operators.
-
XCOMs
- XCOMs allow you to share data between tasks
titask instance object, access XCOM using it- Limited in size,
- 2 GB for SQLite,
- 1 GB for PostgreSQL,
- 64 KB for MySQL
- You can push multiple XCOMs by returning a JSON dictionary
- Use Case:
 XCOM Use Case
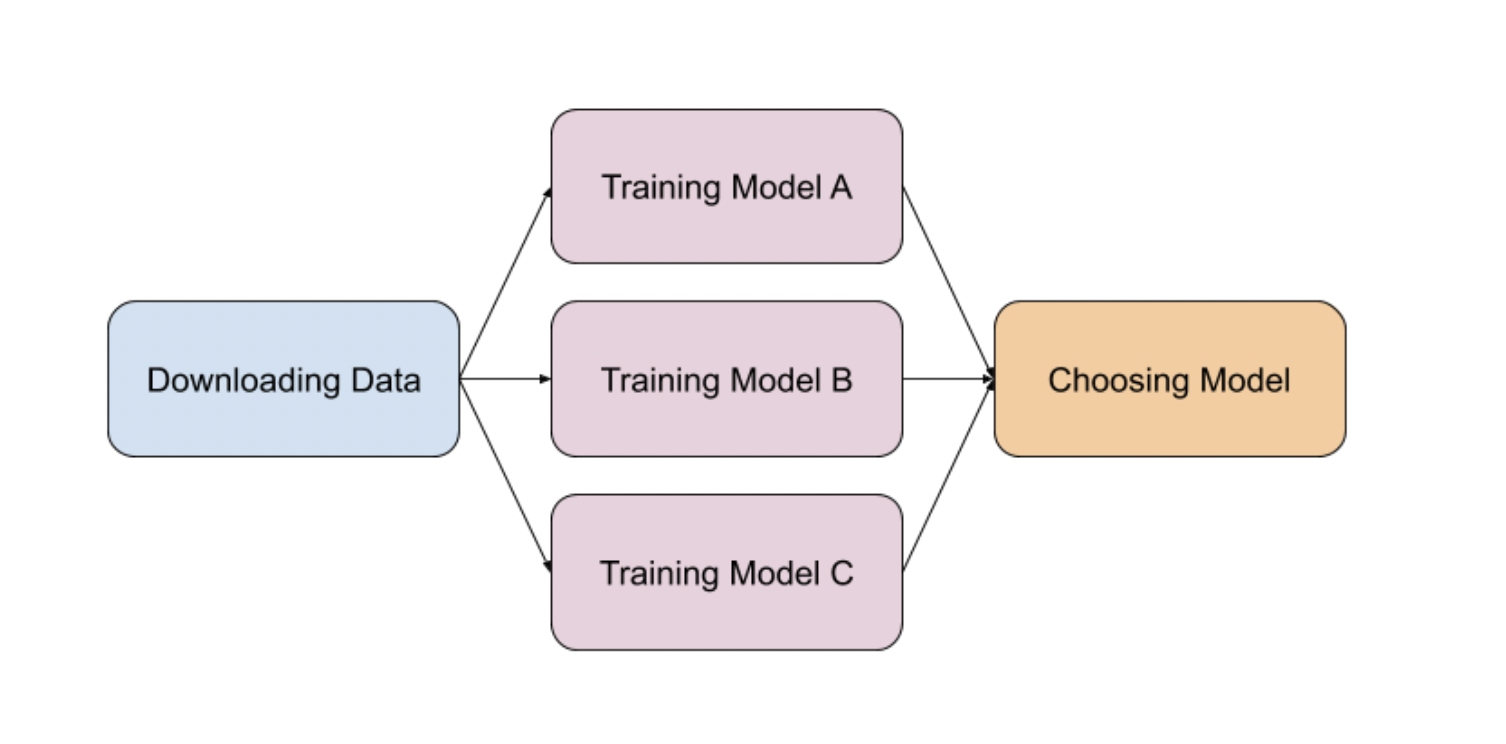
- This data pipeline trains different machine learning models based on a dataset and the last task selects the model having the highest accuracy. The question is, how can we get the accuracy of each model in the task
Choosing Modelto choose the best one? Using XCOMs! - You can think of an XCOM as an object that is stored in the metadata database of Airflow with the following fields:
- The key is the identifier of your XCom. No need to be unique and is used to get back the XCOM from a given task.
- The value is the value of your XCom. What you want to share. Keep in mind that your value must be serializable in JSON or pickable. Notice that serializing with pickle is disabled by default to avoid RCE exploits/security issues.
- The timestamp is the data at which the XCom was created.
- That execution date corresponds to the execution date of the DagRun having generated the XCom. That’s how Airflow avoid fetching an XCom coming from another DAGRun
- The simplest way to create a XCOM is by returning a value from an operator
- The
task_idof the task where the XCom was created. - The
dag_idof the dag where the XCom was created.
- The
- Pushing an XCOM with
xcom_push-
The
xcom_pushmethod is only accessible from a task instance object. With thePythonOperatorwe can access it by passing the parametertito the python callable function.def _training_model(ti): accuracy = uniform(0.1, 10.0) print(f'model\'s accuracy: {accuracy}') return accuracy
-
- Pulling an XCOM with
xcom_pull- In order to pull a XCOM from a task, you have to use the
xcom_pullmethod. Likexcom_push, this method is available through a task instance object.xcom_pullexpects 2 arguments:task_ids, only XComs from tasks matching ids will be pulled-
key, only XComs with matching key will be returned
 def _choose_best_model(ti):
     fetched_accuracy = ti.xcom_pull(key='model_accuracy', task_ids=['training_model_A'])
     print(f'choose best model: {fetched_accuracy}')
- In order to pull a XCOM from a task, you have to use the
- Pulling XCOMs from multiple tasks
-
You just need to specify the
task_ids inxcom_pulldef _choose_best_model(ti): fetched_accuracies = ti.xcom_pull(key='model_accuracy', task_ids=['training_model_A', 'training_model_B', 'training_model_C']) print(f'choose best model: {fetched_accuracies}')
-
- This data pipeline trains different machine learning models based on a dataset and the last task selects the model having the highest accuracy. The question is, how can we get the accuracy of each model in the task
- XCOMs allow you to share data between tasks
-
SubDAGs / TaskGroups
- If you have a lot of tasks in your dag, It might be hard to understand what’s going on. You can group the tasks that belong together using
SubDagsandTaskGroups - SubDAGs
- When a SubDAG is triggered, the SubDAG and child tasks take up worker slots until the entire SubDAG is complete. This can delay other task processing and, depending on your number of worker slots, can lead to deadlocking.
- SubDAGs have their own parameters, schedule, and enabled settings. When these are not consistent with their parent DAG, unexpected behavior can occur.
- TaskGroups
- Unlike SubDAGs, Task Groups are just a UI grouping concept. Starting in Airflow 2.0, you can use Task Groups to organize tasks within your DAG’s graph view in the Airflow UI. This avoids the added complexity and performance issues of SubDAGs, all while using less code
-
You can use dependency operators (« and ») on Task Groups in the same way that you can with individual tasks. Dependencies applied to a Task Group are applied across its tasks. In the following code, we’ll add additional dependencies to t0 and t3 to the Task Group, which automatically applies the same dependencies across t1 and t2
t0 = DummyOperator(task_id='start')

# Start Task Group definition
with TaskGroup(group_id='group1') as tg1:
t1 = DummyOperator(task_id='task1')
t2 = DummyOperator(task_id='task2')

t1 >> t2
# End Task Group definition

t3 = DummyOperator(task_id='end')

# Set Task Group's (tg1) dependencies
t0 >> tg1 >> t3
- If you have a lot of tasks in your dag, It might be hard to understand what’s going on. You can group the tasks that belong together using
-
Branching
- You are able to choose one task or another based on a condition. The
BranchPythonOperatorallows you to choose one branch among branches of your DAG- If the condition is true, you will return the
task_idcorresponding to the task you want to execute next - One of this simplest ways to implement branching in Airflow is to use the BranchPythonOperator. Like the PythonOperator, the BranchPythonOperator takes a Python function as an input. However, the BranchPythonOperator’s input function must return a list of task IDs that the DAG should proceed with based on some logic.
-
For example, we can pass the following function that returns one set of task IDs if the result is greater than 0.5 and a different set if the result is less than or equal to 0.5:
def choose_branch(**kwargs, result): if result > 0.5: return ['task_a', 'task_b'] return ['task_c'] - When you trigger the BranchPythonOperator, one task is trigger next and the others are skipped.
- If the condition is true, you will return the
- You are able to choose one task or another based on a condition. The
-
SLAs
- An SLA, or a Service Level Agreement, is an expectation for the maximum time a Task should take. If a task takes longer than this to run, then it becomes visible in the “SLA Misses” part of the user interface, as well as sending an email of all the tasks that missed their SLA.
- SLA vs. Timeout
- When you define an SLA to a task, then you just receive a notification. It does not do anything to the task.
- Note: If you trigger your DAG manually, your SLA’s won’t be checked
sla_miss_callback: specify a function to call when reporting SLA timeouts- They operate relative to the DAG execution date
-
Miscellaneous
- The Scheduler will only parse files that contain
DAGorAirflow - Setting
Catchup=Falseis the best practice .airflowignoreis the same idea as.gitignore- Each task can have its own
start_date group_idmust be unique, however you can setadd_suffix_on_collision=Trueto add a number to differentiate them- The use of tags, owners, and permission roles
retry_exponential_backoffis used to make the retry process more dynamic and avoid overlaoding an API- If you change the
start_datein a DAG to be in the past, the new past DAG runs won’t be triggered automatically priority_weightis used to organize the sequence of tasks in a DAG
- The Scheduler will only parse files that contain
Once you pass, you’ll earn the beautiful badge below!
![]() DAG Authoring for Airflow Badge
DAG Authoring for Airflow Badge